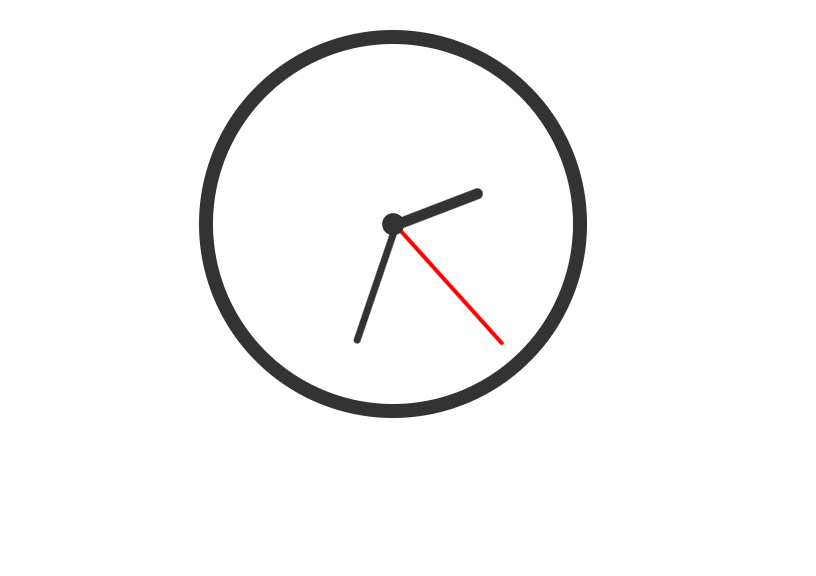
Creating an analog clock for your website can be a fun and educational project. In this blog post, we’ll guide you through building a simple analog clock using HTML, CSS, and JavaScript, while ensuring it’s optimized for SEO on your WordPress site.
Step 1: Setting Up the HTML
First, we need to create the basic HTML structure for our analog clock. Open your WordPress editor and add a Custom HTML block to your desired post or page. Use the following code:
<!DOCTYPE html>
<html lang="en">
<head>
    <meta charset="UTF-8">
    <meta name="viewport" content="width=device-width, initial-scale=1.0">
    <title>Analog Clock</title>
    <link rel="stylesheet" href="styles.css">
</head>
<body>
    <div class="clock">
        <div class="hand hour-hand"></div>
        <div class="hand minute-hand"></div>
        <div class="hand second-hand"></div>
        <div class="center-circle"></div>
    </div>
    <script src="script.js"></script>
</body>
</html>
Step 2: Adding CSS Styles
Next, we’ll style our clock using CSS. You can add this CSS code in the Additional CSS section under Appearance > Customize in your WordPress dashboard.
body {
    display: flex;
    justify-content: center;
    align-items: center;
    height: 100vh;
    background-color: #f0f0f0;
}

.clock {
    position: relative;
    width: 200px;
    height: 200px;
    border: 8px solid #333;
    border-radius: 50%;
    background: white;
}

.hand {
    position: absolute;
    background: #333;
    transform-origin: bottom;
    bottom: 50%;
    left: 50%;
    transform: translateX(-50%);
}

.hour-hand {
    width: 6px;
    height: 50px;
    border-radius: 6px;
}

.minute-hand {
    width: 4px;
    height: 70px;
    border-radius: 4px;
}

.second-hand {
    width: 2px;
    height: 90px;
    background: red;
    border-radius: 2px;
}

.center-circle {
    position: absolute;
    background: #333;
    width: 12px;
    height: 12px;
    border-radius: 50%;
    top: 50%;
    left: 50%;
    transform: translate(-50%, -50%);
}
Step 3: Implementing JavaScript Functionality
Now we’ll add the JavaScript to make our clock dynamic. You can add this script using a custom JavaScript plugin or directly in the footer of your theme (inside the <body> tag in footer.php).
function updateClock() {
    const now = new Date();
    const seconds = now.getSeconds();
    const minutes = now.getMinutes();
    const hours = now.getHours();

    const secondHand = document.querySelector('.second-hand');
    const minuteHand = document.querySelector('.minute-hand');
    const hourHand = document.querySelector('.hour-hand');

    const secondsDegrees = ((seconds / 60) * 360) + 90;
    const minutesDegrees = ((minutes / 60) * 360) + ((seconds / 60) * 6) + 90;
    const hoursDegrees = ((hours / 12) * 360) + ((minutes / 60) * 30) + 90;

    secondHand.style.transform = `rotate(${secondsDegrees}deg)`;
    minuteHand.style.transform = `rotate(${minutesDegrees}deg)`;
    hourHand.style.transform = `rotate(${hoursDegrees}deg)`;
}

setInterval(updateClock, 1000);
updateClock(); // Initial call to display clock immediately
Explanation:
- The
updateClockfunction calculates the current time and applies the correct rotation to each hand of the clock based on the time.
Step 4: Making It SEO-Friendly
To ensure your analog clock is SEO-friendly, follow these practices:
Use Semantic HTML
- Maintain a clear and logical HTML structure to improve accessibility and search engine indexing.
Optimize Load Times
- Minimize JavaScript impact by loading it asynchronously or using a performance optimization plugin.
Enhance Accessibility
- Consider adding ARIA roles and properties if necessary to make your clock more accessible.